
Whether you have installed Raspbain from scratch or used the official image you will probably only be using a some of the total disk space available. To be able to use the un-allocated space you can either resize the existing root partition, or create a separate home partition.
There are advantages and disadvantages to both approaches. You can create a separate home partition for the users’ folders in anywhere on the disk that there is free space available, but by using separate partitions also means that users will not be able to use any of the unused space on the root partition. Alternatively if you put everything in a single partition then if a user creates a number of large files then the system could run out of space, and you can only extend an existing partition if the free space is adjacent to it.
Personally rather than extend the default partition to fill the whole disk I prefer to use a separate home partition, as this keeps my data files separate from the system files and allows me to back up and restore the system files separately.
Create a separate home partition
To modify the disk partitions you need to be running as a superuser.
$ su
Password:
OR
$ sudo -i
Password:
If you are using the official Raspbian image then provided you have not already expanded your root partition to fill the whole disk, you should see the partitions shown below. If you have installed Raspbian following the instructions here the number of partitions will be the same but they will have slightly different sizes.
# fdisk -lu
Disk /dev/mmcblk0: 7948 MB, 7948206080 bytes
4 heads, 16 sectors/track, 242560 cylinders, total 15523840 sectors
Units = sectors of 1 * 512 = 512 bytes
Sector size (logical/physical): 512 bytes / 512 bytes
I/O size (minimum/optimal): 512 bytes / 512 bytes
Disk identifier: 0x000981cb
        Device Boot      Start         End      Blocks   Id  System
/dev/mmcblk0p1            8192      122879       57344    c  W95 FAT32 (LBA)
/dev/mmcblk0p2          122880     5785599     2831360   83  Linux
Make a note of the value for the last sector used by the last partition (5785599), we will need that to work out where our extended partition should start in a minute.
Note – The value on your system may NOT be the same.
Currently the partitions on the disk (or SD card) are arranged as shown in the diagram below. What we will do is to create an extended partition using all the available free space and then create a new /home partition in that extended partition.
 Using an extended partition allows you to subdivide the free space into more than one partition if you want.
First we will create a new extended partition using all the available space on the disk.
Note – The first sector of the extended partition (5785600) is found by adding one to the end of the previous partition which in this case was /dev/mmcblk0p2.
# fdisk /dev/mmcblk0
Command (m for help): n
Partition type:
   p   primary (2 primary, 0 extended, 2 free)
   e   extended
Select (default p): e
Partition number (1-4, default 3):
Using default value 3
First sector (2048-15523839, default 2048): 5785600
Last sector, +sectors or +size{K,M,G} (5785600-15523839, default 15523839):
Using default value 15523839
Check the result.
Command (m for help): p
Disk /dev/mmcblk0: 7948 MB, 7948206080 bytes
4 heads, 16 sectors/track, 242560 cylinders, total 15523840 sectors
Units = sectors of 1 * 512 = 512 bytes
Sector size (logical/physical): 512 bytes / 512 bytes
I/O size (minimum/optimal): 512 bytes / 512 bytes
Disk identifier: 0x000981cb
        Device Boot      Start         End      Blocks   Id  System
/dev/mmcblk0p1            8192      122879       57344    c  W95 FAT32 (LBA)
/dev/mmcblk0p2          122880     5785599     2831360   83  Linux
/dev/mmcblk0p3         5785600    15523839     4869120    5  Extended
Now create the a logical partition using all the space available in the extended partition.
Command (m for help): n
Partition type:
   p   primary (2 primary, 1 extended, 1 free)
   l   logical (numbered from 5)
Select (default p): l
Adding logical partition 5
First sector (5787648-15523839, default 5787648):
Using default value 5787648
Last sector, +sectors or +size{K,M,G} (5787648-15523839, default 15523839):
Using default value 15523839
Check that it has been created, you don’t need to change the partition id as it will default to linux.
Command (m for help): p
Disk /dev/mmcblk0: 7948 MB, 7948206080 bytes
4 heads, 16 sectors/track, 242560 cylinders, total 15523840 sectors
Units = sectors of 1 * 512 = 512 bytes
Sector size (logical/physical): 512 bytes / 512 bytes
I/O size (minimum/optimal): 512 bytes / 512 bytes
Disk identifier: 0x000981cb
        Device Boot      Start         End      Blocks   Id  System
/dev/mmcblk0p1            8192      122879       57344    c  W95 FAT32 (LBA)
/dev/mmcblk0p2          122880     5785599     2831360   83  Linux
/dev/mmcblk0p3         5785600    15523839     4869120    5  Extended
/dev/mmcblk0p5         5787648    15523839     4868096   83  Linux
We need to write these changes to disk and reboot for them to take effect before we can format the new partition.
Command (m for help): w
The partition table has been altered!
Calling ioctl() to re-read partition table.
WARNING: Re-reading the partition table failed with error 16:
   Device or resource busy.
The kernel still uses the old table. The new table will be used at
the next reboot or after you run partprobe(8) or kpartx(8)
Syncing disks.
# reboot
After the system reboots login using ssh or on the console (using Ctrl-Alt-F1) and format the new partition, and copy all the users’ existing files to the new partition. To do this you need to be logged in as the superuser.
$ su
Password:
OR
$ sudo -i
Password:
Use mkfs to format the new partition.
# mkfs -t ext3 /dev/mmcblk0p5
mke2fs 1.42.5 (29-Jul-2012)
Filesystem label=
OS type: Linux
Block size=4096 (log=2)
Fragment size=4096 (log=2)
Stride=0 blocks, Stripe width=0 blocks
304608 inodes, 1217024 blocks
60851 blocks (5.00%) reserved for the super user
First data block=0
Maximum filesystem blocks=1249902592
38 block groups
32768 blocks per group, 32768 fragments per group
8016 inodes per group
Superblock backups stored on blocks:
	32768, 98304, 163840, 229376, 294912, 819200, 884736
Allocating group tables: done
Writing inode tables: done
Creating journal (32768 blocks): done
Writing superblocks and filesystem accounting information: done
Then copy all the existing files from current home partition to the new partition, and (optionally) delete the originals to save space. (Unless you copy the users’ home folders they will not be able to login).
# mount /dev/mmcblk0p5 /mnt
# cp /home/* /mnt/ -rp
# rm /home/* -r  # Optional
Modify fstab so the new /home partition is mounted automatically.
# vi /etc/fstab
proc            /proc           proc    defaults          0       0
/dev/mmcblk0p1  /boot           vfat    defaults          0       2
/dev/mmcblk0p2  /               ext4    defaults,noatime  0       1
/dev/mmcblk0p5  /home           ext3    rw,user,auto,exec 0       0
# a swapfile is not a swap partition, so no using swapon|off from here on,
# use  dphys-swapfile swap[on|off]  for that
Reboot for the changes to take effect
# reboot
After the system reboots you should find that there is a new partition with lots of free space!
$ df -m
Filesystem     1M-blocks  Used Available Use% Mounted on
rootfs              8064  1777      5878  24% /
udev                  10     0        10   0% /dev
tmpfs                203     1       203   1% /run
/dev/sda2           8064  1777      5878  24% /
tmpfs                  5     0         5   0% /run/lock
tmpfs                815     1       815   1% /run/shm
/dev/sdc1         234677  8273    214483   4% /home
Resize the existing root partition
The easiest way to expand your root partition to use all the available disk space if you are using the official Raspbian image is to use the configuration utility – this will be started automatically on the first boot, or can be invoked from the command line.
Note – You need to be running as a superuser.
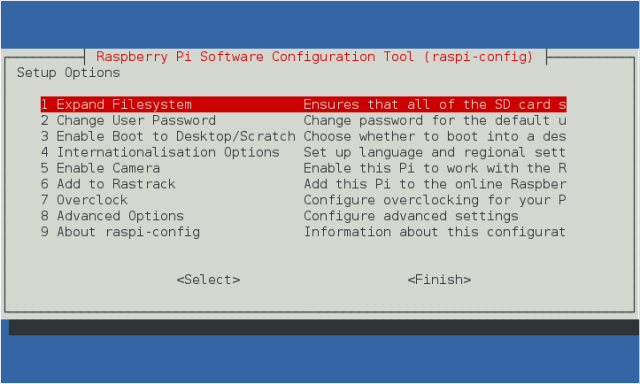
# raspi-config
This will bring up the following screen, selecting the first option will expand the existing partition to fill all the available space.
 If you are not using the default image, or just want to expand the existing root partition yourself, then you will need to follow the steps below.
Initially the root partition will only occupy part of the disk, adjacent to all of the available free space. If the existing partition is not adjacent to the existing free space, for example if there is a swap partition between the root partition and the free space, then you cannot extend it (unless you move the swap partition). What we want to do is to change the size of the existing partition, and then extend the existing file system to use all the extra space.
# fdisk -l
Disk /dev/mmcblk0: 7948 MB, 7948206080 bytes
4 heads, 16 sectors/track, 242560 cylinders, total 15523840 sectors
Units = sectors of 1 * 512 = 512 bytes
Sector size (logical/physical): 512 bytes / 512 bytes
I/O size (minimum/optimal): 512 bytes / 512 bytes
Disk identifier: 0x000981cb
        Device Boot      Start         End      Blocks   Id  System
/dev/mmcblk0p1            8192      122879       57344    c  W95 FAT32 (LBA)
/dev/mmcblk0p2          122880     5785599     2831360   83  Linux
Check that theere is nothing after the partition we want to expand. Then delete the existing partition!
# fdisk /dev/mmcblk0
Command (m for help): d
Partition number (1-4): 2
Don’t panic, and try to relax (if you can’t relax try switching to decafinated coffee for a while) – all we have actually done here is to delete the partition table entry that tells the system where to find the partition.
The trick is to make sure we create a new partition that starts in exactly the same place as the old one. The first sector of the new partition must be the same as the first sector of the original.
Command (m for help): n
Partition type:
   p   primary (1 primary, 0 extended, 3 free)
   e   extended
Select (default p): p
Partition number (1-4, default 2):
Using default value 2
First sector (2048-15523839, default 2048): 122880
Last sector, +sectors or +size{K,M,G} (122880-15523839, default 15523839):
Using default value 15523839
Command (m for help): p
Disk /dev/mmcblk0: 7948 MB, 7948206080 bytes
4 heads, 16 sectors/track, 242560 cylinders, total 15523840 sectors
Units = sectors of 1 * 512 = 512 bytes
Sector size (logical/physical): 512 bytes / 512 bytes
I/O size (minimum/optimal): 512 bytes / 512 bytes
Disk identifier: 0x000981cb
        Device Boot      Start         End      Blocks   Id  System
/dev/mmcblk0p1            8192      122879       57344    c  W95 FAT32 (LBA)
/dev/mmcblk0p2          122880    15523839     7700480   83  Linux
Check everything looks right before writing any changes to the disk, if you quit at this point no changes will be made to the disk.
Command (m for help): w
The partition table has been altered!
Calling ioctl() to re-read partition table.
WARNING: Re-reading the partition table failed with error 16:
Device or resource busy.
The kernel still uses the old table. The new table will be used at
the next reboot or after you run partprobe(8) or kpartx(8)
Syncing disks.
You need to reboot for the changes to the partition table to take effect.
# reboot
After the system reboots login using ssh or on the console (using Ctrl-Alt-F1) and resize the file system.
Note – To do this you need to be logged in as the superuser.
# resize2fs /dev/mmcblk0p2
resize2fs 1.42.5 (29-Jul-2012)
Filesystem at /dev/mmcblk0p2 is mounted on /; on-line resizing required
old_desc_blocks = 1, new_desc_blocks = 1
The filesystem on /dev/mmcblk0p2 is now 1925120 blocks long.
Check that there is lots more free space available!
$ df -m
Filesystem     1M-blocks  Used Available Use% Mounted on
rootfs              7340  2037      4961  30% /
/dev/root           7340  2037      4961  30% /
devtmpfs              53     0        53   0% /dev
tmpfs                 13     1        12   2% /run
tmpfs                  5     0         5   0% /run/lock
tmpfs                 25     0        25   0% /run/shm
/dev/mmcblk0p1        56     6        51  10% /boot
That is it, now you can choose whether to extend your existing partition or use a separate home partition.
Raspberry Pi is a trademark of the Raspberry Pi Foundation

hola talvez halla cambiado algo con la ultima imagen buster-lite tienen alguna idea
mike632t: This is quite an old post, these days if you are using raspbian-lite image then it easier to use raspi-config .
Choose ‘Advanced Options’, then ‘Expand filesystem’.